All my cameras, 15 – Pentax ME Super
August 12, 2018
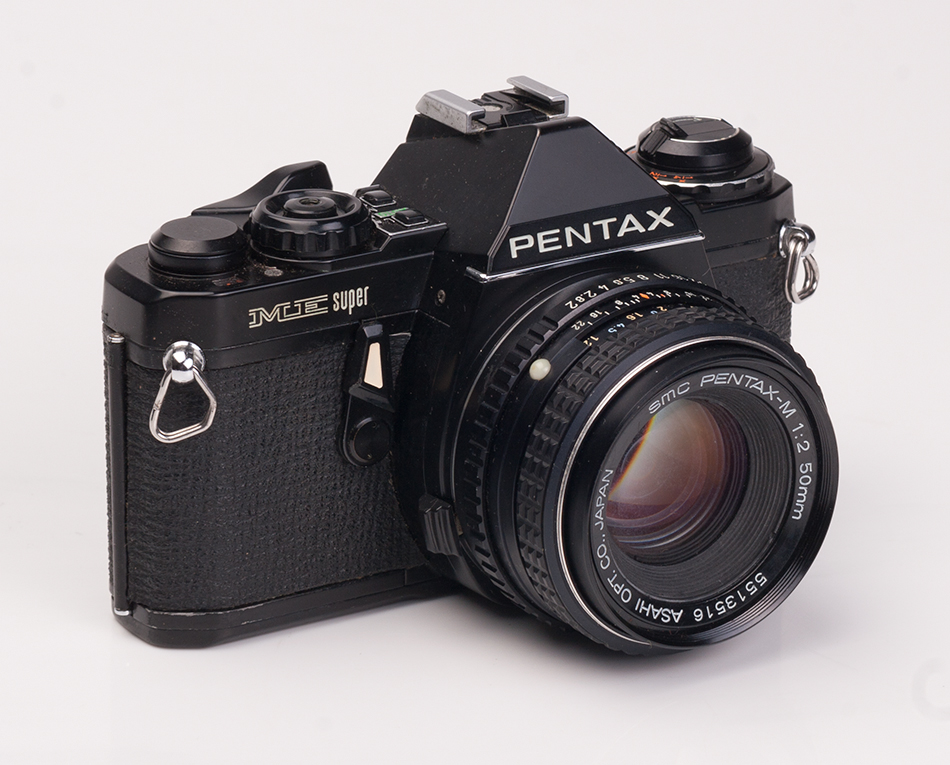
This was the second camera I owned, after the piece of junk Praktica that I had as a teenager. I bought this in my twenties when I still knew nothing about photography. In those days (late 1980s in Sydney) there were lots of camera shops that had large selections of second hand cameras for sale, mostly on consignment I suppose. I got this on the recommendation of a salesman in the shop as I had no idea what was a good camera or not. I used this for about ten years as my only camera, including four years at art school. Then I started to get random light leaks in my photos and a camera repair place said it was a shutter problem that wasn’t worth repairing. So I set it aside and moved to a Canon EOS 5 film camera. I couldn’t sell the Pentax with that problem so just put it in a cupboard and forgot about it. I’m now thinking that I should test it with film and see what results I get, or perhaps show it to my current camera repair person for his opinion. If the body is no good I could sell the lens. Or I could buy another Pentax body, but I already have too many cameras. The rise of digital and online sales platforms meant that starting from about 2005 it was easy and relatively cheap to buy cameras that I could never afford in the old days, so I went from being someone who only ever owned one camera at a time to someone who had dozens.

The ME Super was an excellent camera, the only thing I didn’t like about it were the two small buttons that were used to change shutter speeds. I would much prefer a traditional dial, and always thought the buttons were a design gimmick flaw. Having said that, once I got used to them they were practical enough. The lens quality was also excellent. I shot a lot of slide film in those days and I’m still impressed by the image quality when I look through them.
All my cameras, 14 – Crown Graphic 4×5 press camera
January 6, 2014

This was the first large format camera I owned, a Graflex Crown Graphic 4×5 inch press camera. I had used 4×5 cameras at art school, where they had Toyo monorails, but for years after that I mostly used 35mm and some medium format for my own work. Later, when I was thinking about buying a 4×5 camera I knew a guy who wanted to sell a Linhof Technika kit that came with three lenses that could be used for either rangefinder or ground glass focusing. It looked like a good system however he was asking around $3,000 for the lot and I wasn’t sure about spending that amount on a format I wasn’t familiar with. The worst thing would be to spend all that money and then after a few months to realise that I didn’t really get along with the camera, or even find out that large format wasn’t for me after all (both these things are quite common in photography.) Around that time I was talking about this to a guy who had been a fine art and commercial photographer for decades and he suggested I get a Crown Graphic as a cheap way into large format, which turned out to be excellent advice.

Crown Graphics are plentiful and can be bought for a reasonable price; I think I paid around $400 for mine with a lens. They are also simple to use yet capable of producing high quality photos. There are basically three designs of large format cameras – monorails, field and press. Press cameras were designed to be used by newspaper, wedding and general jobbing commercial photographers. They don’t have all the options that are available on monorail or field cameras but their advantage is being lightweight, simple and able to be set up quickly. When not being used they fold up inside a box; pressing a button opens the front panel and allows the lens and bellows to be moved along the tracks for framing and focusing.

Crown Graphics came with a rangefinder system that allowed them to be focused like a regular handheld camera, however my camera didn’t come with the correct cam for the lens, so it could only be focused with the ground glass. This was fine with me as it was how I was planning to use the camera anyway. A dark cloth is useful for ground glass viewing, however the built-in pop-up viewing hood means that you can often frame and focus without one.
There were two things I didn’t like about this camera. The first is that it was designed to be used in landscape, horizontal format. To make a vertical, portrait orientation photo meant turning the camera on its side to go on the tripod, whereas most large format cameras offer some type of rotating back that lets you change between vertical and horizontal without remounting the camera. The second was the limited range of movements available – essentially just front rise (which becomes front swing when it’s on its side.) I wouldn’t call these design flaws – it’s just part of the simple design of a press camera. These days I make more use of a Chamonix field camera that has a switchable back and a lot of front and rear movements, however it was the lessons I learned by using the Crown Graphic that enabled me to know what I needed as I moved on in large format. I would still recommend it as an ideal camera for anyone who wants to dip their toe into large format and doesn’t want to commit a lot of money.
All my cameras, 13 – Argus 110 MT Instamatic
November 16, 2012

I bought this camera seven or eight years back when I became interested in 110 Instamatic photography. 110 was a small format film introduced in the 1970s, designed for people who didn’t know anything about photography – the amateur snapshot market. The film was enclosed in a plastic cartridge to protect it being ruined by silly mistakes such as opening the camera part way through a roll. There were some cameras with advanced features, such as the Pentax Auto 110, but most were as simple as the camera shown here. This camera is about as point and shoot as you can get. Slide the camera open to reveal the lens. Select a switch that gives a wide or narrow angle of view. Turn the flash on or off. Point and shot. The idea was that you would only photograph outdoors in sun, and indoors with the flash. These simple cameras don’t have light meters; the lens has a fixed point of focus and there is one aperture and one shutter speed – a bit like Holgas and Dianas. If there is enough light, or close enough, then the exposure latitude of film will ensure a usable image. It’s a clever, simple concept, and it worked, because tens of millions of these cameras were sold in the 1970s. The film was still easy to find when I got this camera but supply seems to have dried up now – it doesn’t seem that anyone is making 110 or 126 film anymore. It’s a shame because these cameras are fun to use and the images have a lot of charm. One reason I bought this particular model was the fake wood trim which reminded me of a station wagon we had when I was a child.

All my cameras, 12 – Olympus SP N
November 16, 2012

The Olympus SP N is a 35mm fixed lens rangefinder camera dating from the mid 1970s – an era when almost every camera company had one or more models in this category. Generally the lenses are in the normal focal length range (40 to 50mm), with fast maximum apertures and good image quality. The Olympus has a 42mm f/1.7 lens with excellent image quality. The N is a slight variation on the more common SP model, (just adding a battery test feature as far as I’m aware.) Cameras in this category are an easy and relatively cheap way to get into rangefinder style photography for those who are only familiar with SLR cameras.
Like most classic film cameras it is a simple piece of equipment, particularly in comparison to the complexity of today’s digital cameras. The front panel has a PC socket for firing studio flash. The side of the camera nearest to the PC socket has a dial for setting the film speed on both the ASA (ISO) and DIN scales. The ISO range goes from 25 to 800 in 1/3 of a stop increments. The meter was designed to be powered by a 1.35 v mercury battery. These are no longer made however I have had accurate results using the cheap hearing aid batteries of the same voltage. These are a bit smaller then the old batteries so I put a circle of cable around the battery to hold it in place. Of course you could use a hand held meter but it’s nice to be able to use the camera meter. The meter readout appears in the top of the viewfinder window, where a needle will point to a number on the EV scale between 3 and 17. Based on this reading you would then choose a combination of aperture and shutter speed for correct exposure. How this works in practice is an impressive bit of industrial design. The shutter speed and aperture controls are next to each other on the lens, with a small window displaying the EV number at the far end of the shutter dial. Different combinations will reveal different EV numbers, with the idea being that you choose a combination that gives the same EV number given by the light meter. Even more impressive is that once you get this EV number you can keep it while turning the aperture and shutter dials together to bring up different combinations of aperture and shutter speed while allowing in the same amount of light. For example, if the meter reads EV 10 at 100ISO, f/5.6 at 1/30 will bring up EV 10 on the lens. If I want more depth of field I can turn them together to f/16 at 1/4 which still gives EV 10, or I can move them to f/2 at 1/250 for less depth of field or a faster shutter speed. Hats of to whoever came up with that clever system.

The camera also has an auto exposure setting, which I have never used, as well as a clever auto flash feature that I have used and which works well. For auto flash you need to know the guide number of the flash and relate it to the ISO of the film. The auto flash settings are on the same lens ring as the apertures, so once you turn to the GN section you are getting the camera to choose the aperture. The GN is set according to the flash unit in use and assumes the film is 100 ISO. As you manually focus the lens, the camera takes into account the GN and distance and calculates the correct aperture. This is based on the simple flash formula GN / distance = aperture; e.g. with a flash with a guide number of 40 (in meters) and a focus distance set to 5 meters the correct aperture is f/8 and the camera will know to select this. If the film ISO is not 100 you could account for this by choosing a different guide number to fool the camera into selecting the correct aperture.
The viewfinder is bright and has the classic rangefinder design of frame lines that show what will be in the photo, along with a generous amount of space outside the lines so the photographer can see what else might be included or excluded to improve the composition. This type of viewing is similar to the framing devices that artists use to determine the composition of a drawing, and is significantly different to SLR through the lens viewing. Having a fixed lens avoids the problem of requiring a mechanism to bring up varying frame lines for changing focal lengths. These older cameras are far from being obsolete or collectors items – if you shoot film and get one of these in good working order they are capable of producing excellent results as well as being enjoyable to use.
All my cameras, 11 – Zero Image 2000 pinhole
September 30, 2012

One of my favourite cameras is this Chinese made Zero Image 2000, a pinhole camera that makes 6×6 images. I bought this one second hand from a person who wasn’t making much use of it. He had modified it from how it was originally sold by removing the sliding shutter and replacing that with a 52mm step up ring and matching lens cap. I probably wouldn’t have thought of doing this myself, however it is a good idea. I’ve heard from people who have the standard camera that the sliding shutter can move if the camera is loose in a bag, causing unwanted exposures. I’ve never had a problem with the lens cap coming off, and having the filter thread also allows me to use filters such as red and neutral density.
It’s a small, lightweight camera, easy to carry and easy to place in a variety of positions. This flexibility gives me ideas about trying new points of view, such as sticking velcro strips to the back of the camera so I can attach it to a ceiling looking down on a room. There is a tripod socket in the base of the camera, pretty essential as pinhole exposures are generally long. I also have a cheap magic arm accessory that has a tripod fitting at one end and a clamp at the other for attaching the camera to various items.

All my cameras, 10 – Praktica super TL
July 28, 2012

This was a surprise – I found my first camera while cleaning out a garage. I bought this second hand when I was a teenager in the late ’70s and had lost track of its whereabouts years ago. I had remembered it as a piece of junk and therefore being one of the reasons why I wasn’t a particularly good photographer as a teen, and looking at it now I think I was correct – this is a pretty shoddy old camera. Part of the explanation for how I ended up with such an inferior device is that I bought it from a dodgy character I knew around Bondi, rather than doing the sensible thing of going to a camera store and asking for advice. I must have put the word out that I was interested in photography and one day this character presented me with this camera as the supposed answer to my prayers. From memory I paid $50 for it, which would have been a lot of money for me at that time.
It is a basic mid ’70s SLR, from an era when there were some exceptional cameras being made by Nikon, Olympus, Pentax and the like. Unfortunately Prakticas were made in East Germany rather than Japan, and the build quality is second rate. The overall feeling is of uninspired design, cheap materials and poor workmanship. The shutter speeds are unpredictable and the controls such as the shutter speed dial are a bit loose. Of course this might happen with a camera that has been in storage for decades, but I remember this was how the camera felt at the time. It was a surprise to find it again, and my first impulse was to put it out for council collection, but then I decided I might as well put a few rolls of film through it to see what the results were like. I didn’t bother putting a battery in as it is from the era of mercury batteries and would only power the light meter, the rest of the camera operations being completely mechanical. The standard lens is a 50mm f/1.8 prime made by Meyer Optik, with the designation Oreston. It was covered in dust when I found it and I decided to leave that there in case it gave an interesting look to the photos. By ear I could tell that the shutter speeds were all over the place so I decided to use ISO 400 B&W film to give as much exposure latitude as possible.

The rear view shows the odd film loading system. One useful feature is the thin vertical metal bar on the take up spool. When loading the film you insert the leader under this and it grabs the film tightly, which makes loading easy. A not so good element is the small metal panel at the bottom next to the take up spool. The lower edge of the film has to go behind this, which seems like poor design as there doesn’t seem to be any necessity for it. Another good thing about the camera is the depth of field preview button. This is the large black button on the front of the camera next to the lens. Pressing this closes the aperture down to whatever is set on the lens, so you see the optical effect through the viewfinder. From memory this button also operates the light meter. I’m thinking now that I might try putting a cheap hearing aid battery in to find out if the meter still works and if so whether it’s accurate. The shutter speeds allegedly range from 1/500 of a second down to 1 second, plus a bulb setting. The camera doesn’t have a hotshoe for a flash but does have two sockets on the body for flash connectors, marked F and X. F was for old fashioned flash bulbs while X is for electronic flash. The maximum sync speed for flash is 1/40 of a second and there is a lighting bolt symbol next to the B setting on the shutter dial for this.

When looking through the lens I had the feeling that it might be low contrast and likely to give diffused highlights. Apart from the external dust it also appears the lens has small scratches and some specks of fungus. Old lenses are also lower contrast and more likely to flare and give highlight diffusion when compared to contemporary lenses because of the simpler coatings that were applied then. The film used was Fuji Neopan 400 processed in Agfa Rodinal. The results were as expected, and I somewhat like the look. Rather than throwing the camera out, I am now thinking about using it a bit more. I’m interested to see what results it will give with colour film and also to try it with flash. The second test roll jammed part way through, the mirror is prone to getting stuck in the up position and the shutter release getting jammed in the down position, while the film advance lever sometimes needs more than one stroke to advance the film, so it’s questionable how much success I will have. It’s not worth getting it serviced, but I am tempted to show it to the camera repair guy I use to see the expression of horror on his face. I have also realised that the lens mount is the M 42 screw mount which means that it would be possible to put my Krasnogorsk K3 zoom lens on it.

All my cameras, 8 & 9; K-3
January 12, 2011

Due to circumstance I ended up with two of these. K-3 is the common name for a model of the Russian made Krasnogorsk 16mm movie camera. They are a popular choice for people wanting 16mm picture quality at a low entry cost. The cameras are pretty basic; they are clockwork powered, you wind the big key on the side of the camera and it will run for about 25 seconds at 24fps. It’s quite noisy so not suitable for sound recording. They come with a standard zoom lens but most of them have a lens mount that will accept the standard Pentax M42 screw mount lens. I found the quality of the standard lens on mine was very good.

They take the standard 100 foot daylight reels and are straightforward to load. Overall a basic, easy to use camera that gives excellent picture quality, bearing in mind the limitations.
![]()
All my cameras, 6 & 7; Canon 814 Super 8
January 9, 2011

Two generations of the same design. It seems the most desirable Canon Super 8 model was and is the 1014. The 814 is generally regarded as being one rung lower; it doesn’t have the same zoom range or some other pro features, however is still a good unit and available at a more reasonable price.It is called the 814 because the maximum aperture is f/1.4 and it has an 8 times zoom range (7.5 to 60mm).

The photos above are of the later model known as the Auto Zoom 814 Electronic. The photos below are of the earlier 1970s model designated as the Auto Zoom 814. One key difference is that the earlier model used two 1.35 v mercury batteries to operate the light meter and these are no longer made. You can adapt hearing aid batteries or simply use an external meter. Otherwise it uses AA batteries to run the motor and zoom. The later 814 Electronic took four AA batteries and the meter works off these.
One thing I liked about the older model is that it has a viewfinder shutter to prevent light entering the camera via the viewfinder. I found this useful for doing long takes with the camera on a tripod where I had no need to keep my eye to the finder. I started out with the older one and used it with Kodacrome and T64. Results were very good and then I picked up the later version and used it for most of my filming. I shot a wide range of emulsions in this camera; Vision 200 and 500 neg film, Kodachrome, T64, E100. This was all for my ‘Landmarks From Home’ project for which I also used Single 8 film. Everything was shot silent at 18fps locked off on a tripod so I never used any of the more obscure functions such as single frame and variable shutter.


All my cameras, part 5; Fujica Z800
November 12, 2010

This is a Japanese made (Fuji) motion picture camera. It uses Single 8 film, which is the same format as Super 8 but comes in a different cartridge. Super 8 film cartridges are shaped like a box whereas Single 8 cartridges look like a capital B. Both films were introduced around the same time in 1964/65.
The Z800 was a reasonably high end model. As with Super 8 there were basic consumer models as well as more high end ‘pro’ featured ones. The very best Fujica model was the Z1000 which is still keenly sought after. I would have liked to get one but the asking price was always too high for my purposes. I was working on a project for several years in which I shot a lot of Super 8 film and at one stage I decided to also explore Single 8 as the two formats can be mixed together, particularly if you are finishing for digital output. For my needs the Z800 was good quality at a reasonable price. I bought it second hand via the cinematography web forum.

It has an f/1.8 8-64 mm zoom lens with EBC, (electron beam coating). Fuji have long had a reputation for making good quality cameras with excellent lenses. The lens can be zoomed either manually or with a power switch. It has a selection of shutter speeds of 18, 24 or 36 frames per second. I always used 18 fps, same with Super 8. It can also do single frame exposures, another function I had no need for and never tried. There is a variable shutter control for fade-ins and fade-outs, however I always filmed with the shutter wide open. There is a fold down handle if you are doing hand held filming. When the camera is to be used on a tripod the handle folds up under the body, revealing the tripod socket.It can be operated via a cable release and there is also a ‘run lock’ switch for extended takes.
The camera is powered by 4 AA batteries. These run the film transport and power zoom as well as the light meter. There is an option for full auto exposure as well as manual override. I found the meter to be accurate enough for shooting reversal and would generally do a range reading of the scene, choose the aperture that would give the best highlight exposure and then lock this in using the manual exposure setting. I always had good results with this method. Full auto exposure is risky (with all cameras) as the meter can shift the exposure during filming if light or dark elements enter the frame, even though the light level remains consistent.

The stock I used was Fujichrome R25N a 25 ISO daylight balanced reversal film. This is still available from Fuji and can be processed in Japan. It’s a beautiful emulsion and reason enough to film with Single 8. It has grain and a colour palette that is similar to traditional Super 8 Kodachrome, however it probably won’t be available for much longer. Fuji already announced the discontinuation of Single 8 several years ago and then decided to let it run for a few more years. I believe the current emulsions will be sold and processed until mid 2012. After this the cameras can still be used as some companies are packaging still films such as Velvia into the cartridges. It seems we are very close to the end of an era.
I’m glad that I got to experience this film while it was still easily available. I suspect it will become legendary once it’s gone, like Polaroid 665/55, Agfa APX 25, Kodak HIE and all the others. The Z800 is a very good camera, easy to understand and operate and produces good results. I bought my film from Tak at Retro and had it telecined (digitised) at Uppsala Bildteknik in Sweden. I live in Sydney but you have to be prepared for global mail order if you want to do this.
All my cameras, 4 : Minolta Autopak 700
February 24, 2009

A couple of years ago I started to take an interest in Instamatic photography, particularly the 110 and 126 formats. Essentially 126 is square and from the 1960s & 110 is rectangular and from the 1970s. Until recently I never thought about using these formats as I was happy enough with 35mm and bigger; also I was probably a bit of a film snob & saw them as somehow inferior. One thing that has sparked my interest is what seems to be their imminent exctinction. I can happily ignore something for decades until I hear it is about to be discontinued or demolished.
2005 was a big year for my feelings about traditional film based photography. This was the year that Kodak ceased production of B&W paper and also when Agfa Photo went into liquidation. Products that I took for granted were no longer available. I think it was also the year that the big Fletcher’s shop on Pitt St, Sydney suddenly closed. In the ’90s I used to visit the back room at Fletcher’s to look at all the stock in their film fridge. They carried every film that was available in Australia. Sometimes I would decide to explore all the slow films & would buy a couple of rolls each of Kodachrome 25, Ektar 25, Royal Gold 50, Agfa Ultra 50. All no longer manufactured. Once I’d had enough with the slow films I would try all the fastest films & I remember buying Scotch Chrome 1,000 & Konica 3200 neg film (still have a few unexposed rolls of each in the freezer, probably time for a clip test).
None of the big manfacturers is making 126 format today. Ferrania, the Italian film company was producing it as recently as a few years ago under the Solaris brand (also sold in some markets as Adox). I bought my film via the net from a site based in Canada called the Frugal Photographer. I believe they bought a large quantity of the last Ferrania run. I did some research into cameras, wanting to explore two approaches to the format; first with as much control as possible and secondly with a basic point & shoot approach. For the basic approach I bought a Kodak Instamatic 104. This camera has fixed focus & one aperture & shutter speed, basically set for sunny days.
The Minolta Autopak 700 I bought for the ability to manually focus & have a range of apertures and shutter speeds. I think I paid about $20 on ebay, always a bit of a gamble but I got lucky with an example that works well. It’s a rangefinder design which means that framing & focusing is done through a viewfinder rather than through the lens. The viewfinder is nice & clear although the focusing patch is a little faint. This is common with older cameras & I’ve been told it’s easy enough to have cleaned for a brighter patch. I can focus perfectly well as it is so I haven’t done anything about this.
Also in the viewfinder is a readout from the light meter indicated by a needle that points to exposure values between 8 and 17. The meter is powered by a PX625 mercury battery & these are no longer made for environmental reasons. I had one that was in a Super 8 camera so I put it in the Minolta & the meter needle works fine. I wasn’t sure how accurate the battery or meter would be so I have always used my Soligor spot meter to set exposure. If you did use the camera meter, the EV number displayed in the finder is transferred to the EV scale on the lens. The lens has rings for setting the aperture & shutter speed and these are connected to the EV scale. So if I set the EV scale to 15 I can get an aperture of f/11 and a shutter speed of 1/250, or f/16 @ 125, or f/22 @60, which all makes sense to me.
The aperture range is from f/2.8 to f/22 and the shutter speeds go from 1/30 sec to 1/250 plus bulb. To make it clear, there are only 4 shutter speeds on this camera, not much compared to a modern SLR but still 3 more than most instamatics. Combined with the 7 apertures & bulb you should be able to get a good exposure in any lighting conditions. There is also a full auto mode, set by turning both aperture & shutter rings to their respective A settings.
The lens is a Rokkor 38mm & I like the results it produces. I’ve only put a few rolls through it so it’s hard to say too much. I wish I could get some B&W film to expose in it & then print in a darkroom as that is when I tend to really see what a lens does. Apart from the above it’s a pretty simple camera with a hot shoe & PC socket for firing flash. I haven’t given much thought to using flash with it but it might be interesting to try in a studio sometime. Overall, it’s a nicely designed, solid metal camera that sits well in my hand, is straightforward to use & produces results that I’m happy with. Not bad for $20. It’s also enabled me to explore the square 126 format & discover some new looks.
Minolta produced this model from approx the mid ’60s to the mid ’70s. Of course they are totally out of the camera business these days. There were also other manufacturers producing high quality 126 cameras, notably Kodak & Rolleiflex. I would have been interested to buy any of them but happened across the Minolta first.

